05 - 啟動 EC2 執行個體 / Launch an EC2 Instance
您好 {{客戶稱呼}},非常感謝您協助我們設定這台伺服器!EC2 是 AWS 上的虛擬電腦,我們的系統 lattice-cast 就會跑在上面。以下是完整的操作說明,約需 25 分鐘,遇到任何不清楚的地方都歡迎來信,我們立刻協助您。
💡 貼心提醒:截圖可能因 AWS 介面更新略有差異,以實際畫面為準。若畫面找不到按鈕,請寄信告訴我們,我們立刻協助。
⚠️ 重要:請勿使用 AWS 中國區 請使用
aws.amazon.com。若頁面出現「中國區 / 光環新網 / 西雲 / Sinnet / NWCD」字樣,請關閉視窗從aws.amazon.com重新進入。 (中國區是另一個獨立服務,與我們要的系統不相容。)
render_with_liquid: false
預估 / Estimate
- 時間:約 25 分鐘
- 費用:t3.small 約 USD $15 / 月(依實際執行時間計費;首年 750 小時免費方案可用)
-
需準備:
- 已完成教學 02(IAM 使用者與 Access Key 已建立)
- 已登入 AWS Console(使用 IAM 使用者,請勿用 Root 帳號)
- 瀏覽器可開啟
https://console.aws.amazon.com - 電腦可下載並儲存
.pem金鑰檔(下載後無法重取,請務必備份)
render_with_liquid: false
名詞解說 / Glossary
| 名詞 | 說明 |
|---|---|
| EC2(Elastic Compute Cloud) | AWS 上的虛擬電腦,可以選擇規格、作業系統,就像租一台遠端主機 |
| 執行個體 (Instance) | 一台正在執行的虛擬電腦 |
| Region(區域) | AWS 機房的地理位置,就像選一個城市。我們建議選「東京 (ap-northeast-1)」,台灣連線速度最快 |
| AMI(Amazon Machine Image) | 虛擬電腦的作業系統安裝光碟,我們用 Ubuntu 22.04 LTS |
| 金鑰對 (Key Pair) | 一組數位鎖鑰,用來讓我們遠端登入伺服器。您下載後交給我們 |
| 安全群組 (Security Group) | 防火牆規則,設定哪些網路請求可以進出這台主機 |
| EBS 磁碟 (Elastic Block Store) | 虛擬硬碟,存放系統與資料 |
| gp3 | 目前最新的通用型 SSD,速度好又省錢 |
| vCPU | 虛擬處理器核心,t3.small 有 2 個,足夠一般應用 |
| 彈性 IP (Elastic IP) | 固定不變的公開 IP,讓外界能持續找到這台主機 |
render_with_liquid: false
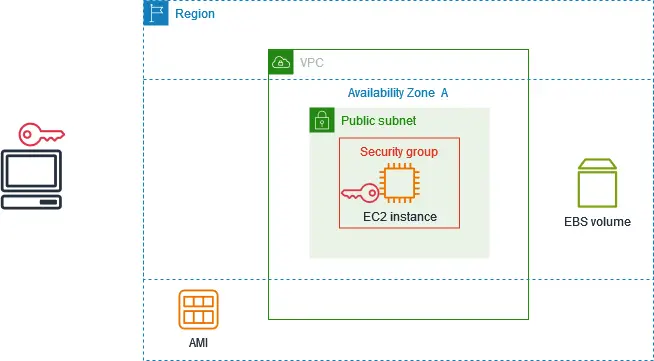
EC2 架構示意 / Architecture Overview
啟動完成後,您的 AWS 環境會長成下圖的樣子:
 來源:AWS Docs — Get started with Amazon EC2,取用日期 2026-04-21
- 您的電腦(左方筆電圖示)透過金鑰對 SSH 連線到 EC2 Instance
- EC2 Instance 被安全群組(Security Group)保護,在 VPC 的公開子網路中
- EBS Volume 是這台主機的硬碟
- AMI 是建立主機時使用的作業系統映像
render_with_liquid: false
操作步驟 / Steps
步驟 1:確認 Region(選與 RDS、S3 相同的區域)(Step 1: Confirm Region)
若您已完成 RDS(教學 07)或 S3(教學 06)的設定,請確認 EC2 放在同一個 Region,可避免跨區流量費用。
- 登入 AWS Console:
https://console.aws.amazon.com - 畫面右上角有一個地點名稱,例如「亞太區域 (東京) Asia Pacific (Tokyo)」
- 若需要更換,點擊該名稱,從下拉選單選擇正確的 Region
⚠️ Region 非常重要:EC2、RDS、S3 必須在同一個 Region,否則資料傳輸會產生額外費用且連線延遲增加。
render_with_liquid: false
步驟 2:進入 EC2 服務(Step 2: Navigate to EC2)
 來源:Amazon EC2 產品頁(中文),取用日期 2026-04-21
 來源:Amazon EC2 Product Page (English),取用日期 2026-04-21
- 在 AWS Console 頂部搜尋欄位輸入「
EC2」 - 點擊搜尋結果中的「EC2」進入服務
- 在左側導覽列找到「執行個體 (Instances)」→「執行個體 (Instances)」
- 點擊右上角的橘色按鈕「啟動執行個體 (Launch instances)」
render_with_liquid: false
步驟 3:填寫名稱與標籤(Step 3: Name & Tags)
- 在「名稱和標籤 (Name and tags)」欄位輸入:
lattice-cast-app - 標籤(選填,建議加入方便後續識別費用):
- Key:
Project - Value:
lattice-cast
- Key:
render_with_liquid: false
步驟 4:選擇 AMI(作業系統)(Step 4: Choose AMI)
- 找到「應用程式和作業系統映像 (Application and OS Images (Amazon Machine Image))」區塊
- 確認已選「快速入門 (Quick Start)」標籤
- 點擊「Ubuntu」圖示
- 在下拉確認選取:Ubuntu Server 22.04 LTS (HVM), SSD Volume Type
- 架構 (Architecture) 選「64 位元 (x86)(64-bit (x86))」
⚠️ 請選 22.04 LTS,而非 24.04 或其他版本。LTS(Long Term Support)= 長期支援版本,穩定性更高,我們的系統相依於此版本。
render_with_liquid: false
步驟 5:選擇執行個體類型(Step 5: Choose Instance Type)
 來源:Amazon EC2 T3 執行個體,取用日期 2026-04-21
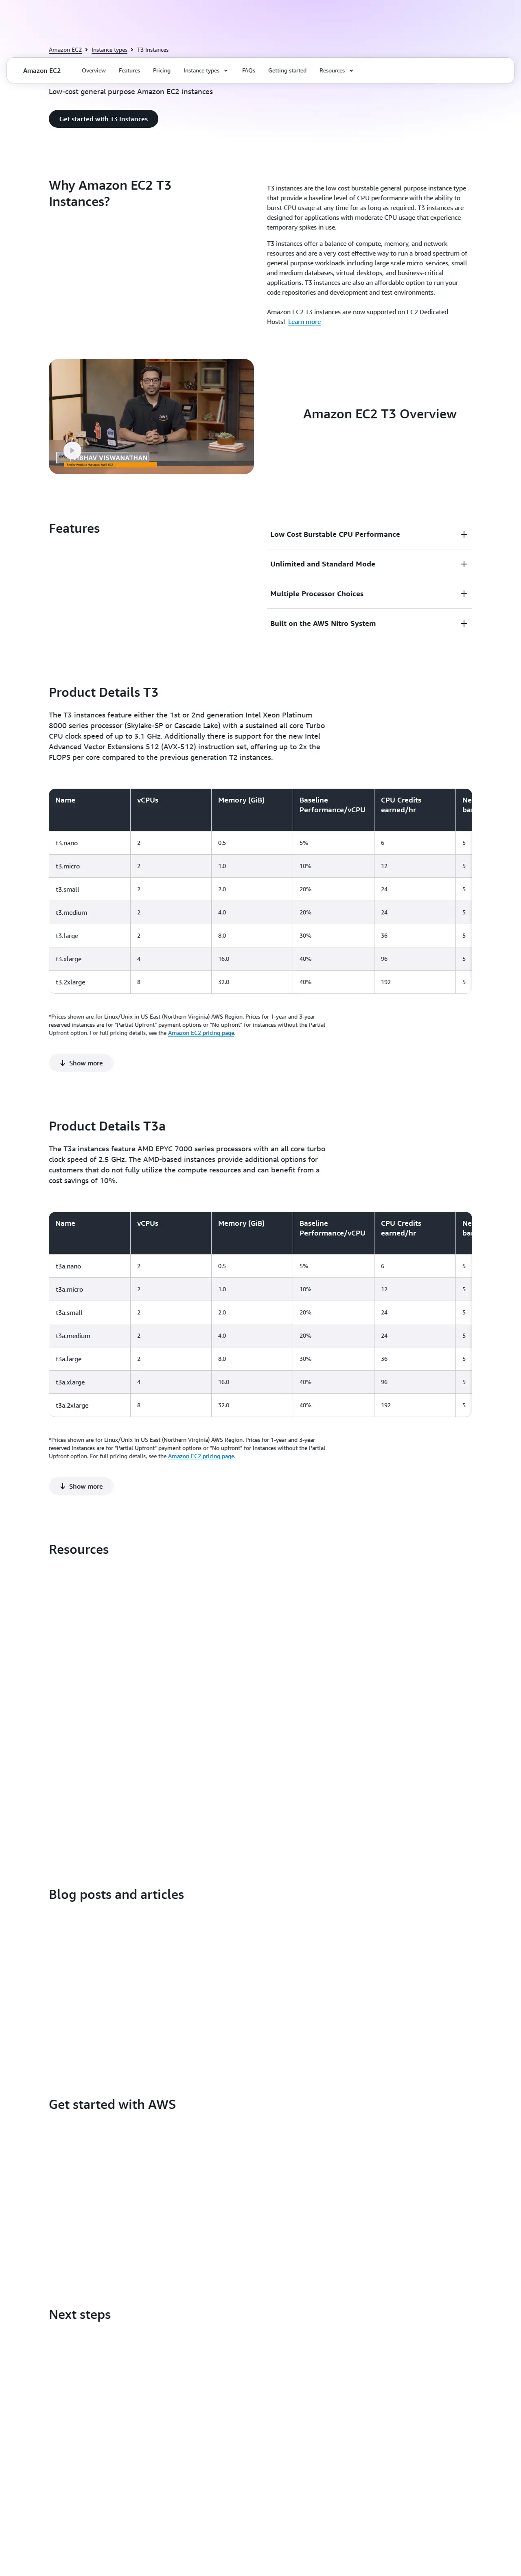 來源:Amazon EC2 T3 Instances,取用日期 2026-04-21
- 在「執行個體類型 (Instance type)」搜尋欄位輸入「
t3.small」 - 選擇 t3.small
| 類型 | vCPU | 記憶體 (RAM) | 建議用途 |
|---|---|---|---|
| t3.small | 2 | 2 GB | lattice-cast 標準部署 |
| t3.medium | 2 | 4 GB | 若日後 RAM 不足可升級 |
💡 費用參考:t3.small 在東京 Region 約 USD $0.0208 / 小時,全月約 $15。
render_with_liquid: false
步驟 6:EC2 定價參考(Step 6: Pricing Reference)
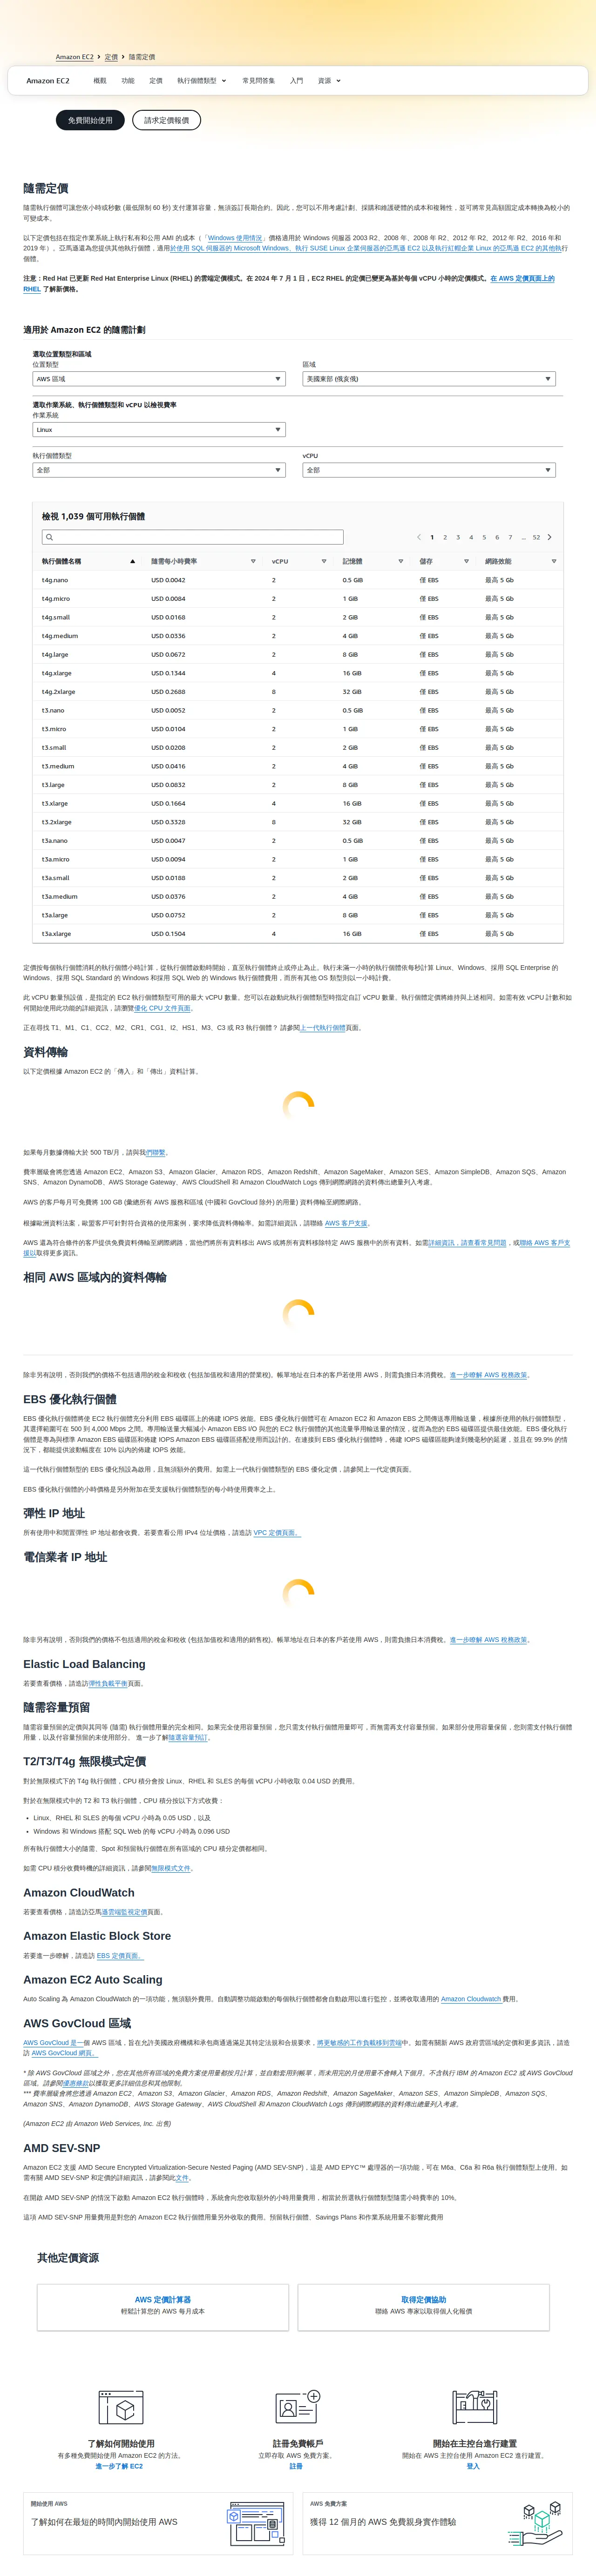 來源:EC2 隨需執行個體定價(中文),取用日期 2026-04-21
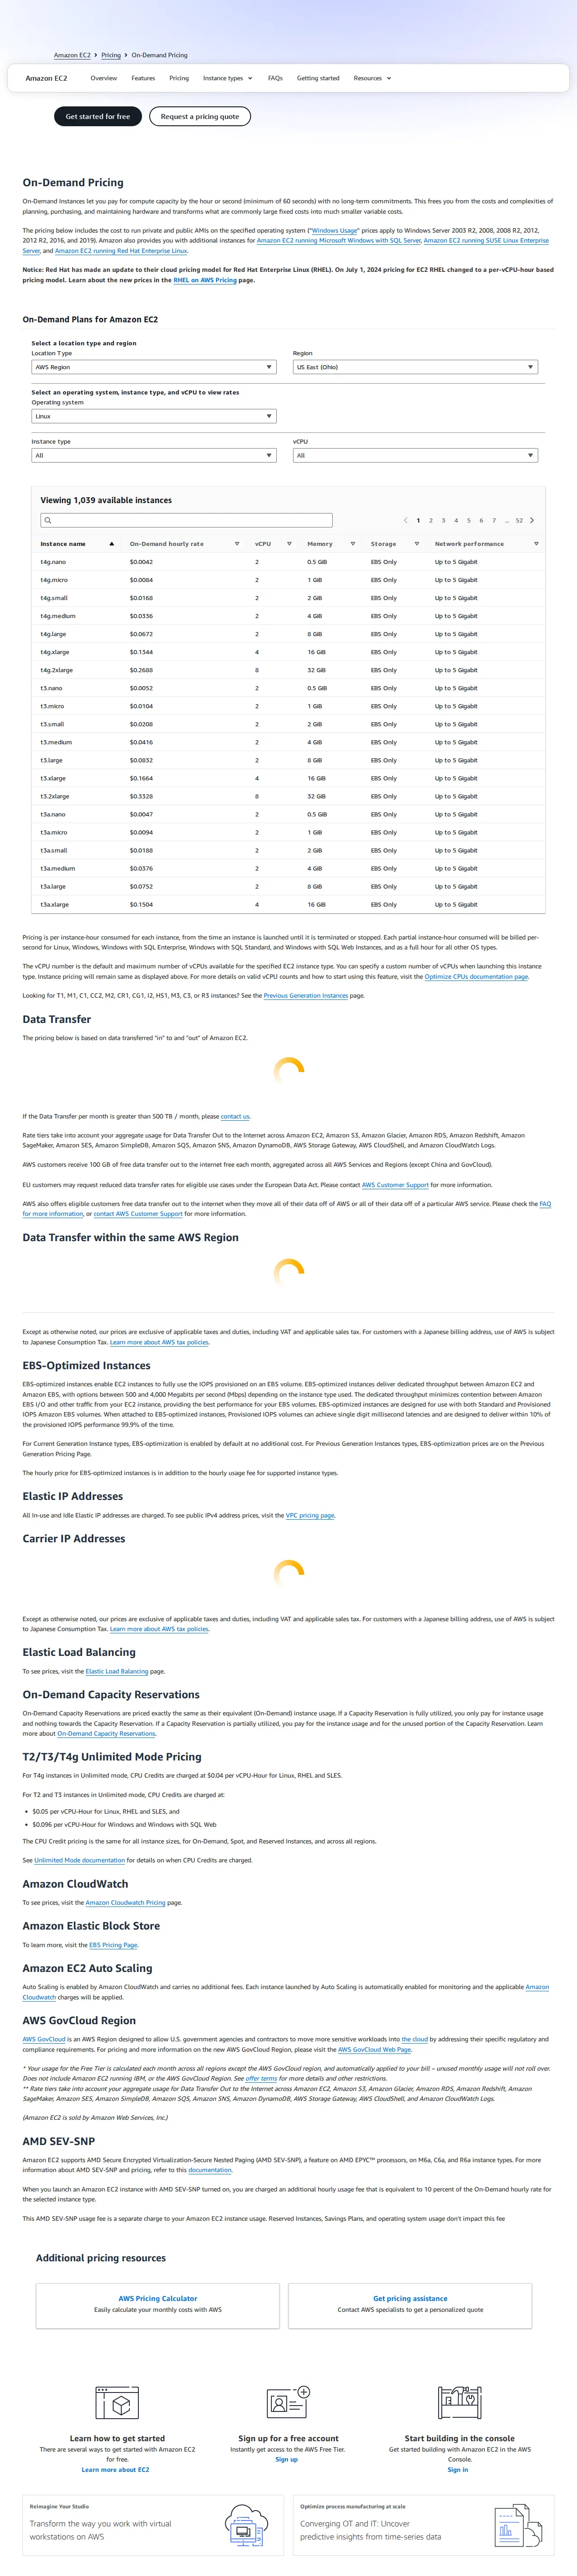 來源:EC2 On-Demand Instance Pricing (English),取用日期 2026-04-21
定價頁可確認最新 t3.small 費率。頁面上方可切換 Region 查看各地區的價格差異。
render_with_liquid: false
步驟 7:建立金鑰對(Step 7: Create Key Pair)
⚠️ 金鑰只能下載一次! 下載後請立即存入安全位置(1Password / USB 備份)。AWS 不保留私鑰,遺失即無法 SSH 登入主機。
操作流程示意:

  [金鑰對(登入)區塊]
        |
        ↓
  點擊「建立新的金鑰對 (Create new key pair)」
        |
        ↓
  填寫名稱:lattice-cast-key
  類型:RSA
  格式:.pem
        |
        ↓
  點擊「建立金鑰對 (Create key pair)」
        |
        ↓
  瀏覽器自動下載 lattice-cast-key.pem  ← 請立即備份
- 在「金鑰對(登入)(Key pair (login))」區塊,點擊「建立新的金鑰對 (Create new key pair)」
- 填寫金鑰對名稱:
lattice-cast-key - 金鑰對類型 (Key pair type):選「RSA」
- 私有金鑰檔案格式 (Private key file format):選「
.pem」 - 點擊「建立金鑰對 (Create key pair)」— 瀏覽器會自動下載
lattice-cast-key.pem - 請立即將此
.pem檔移至安全位置,稍後透過 1Password 傳給我們
render_with_liquid: false
步驟 8:設定網路與安全群組(Step 8: Network & Security Group)
安全群組就像防火牆規則:決定哪些人可以從哪個「門(Port)」進出這台主機。
- 在「網路設定 (Network settings)」區塊,點擊「編輯 (Edit)」展開設定
- VPC:保持預設(Default VPC)
- 子網路 (Subnet):保持預設
- 自動指派公有 IP (Auto-assign public IP):設為「啟用 (Enable)」
- 防火牆(安全群組)(Firewall (security groups)):選「建立安全群組 (Create security group)」
- 安全群組名稱輸入:
lattice-cast-sg - 按「新增安全群組規則 (Add security group rule)」,依下表逐條新增:
| 類型 (Type) | 通訊協定 (Protocol) | 連接埠 (Port) | 來源 (Source) | 說明 |
|---|---|---|---|---|
| SSH | TCP | 22 | 我的 IP (My IP) | 只允許您目前的 IP SSH 登入 |
| HTTP | TCP | 80 | Anywhere (0.0.0.0/0) | 允許所有人 HTTP 存取 |
| HTTPS | TCP | 443 | Anywhere (0.0.0.0/0) | 允許所有人 HTTPS 存取 |
⚠️ SSH 來源請務必選「我的 IP (My IP)」,不要選 Anywhere(0.0.0.0/0),否則全球任何人都可嘗試暴力破解您的主機。
📝 與 RDS 的互通設定(安全群組到安全群組的規則)會在完成 RDS 教學(07)後由我們協助您新增,現在不需要設定。
render_with_liquid: false
步驟 9:設定儲存(Step 9: Configure Storage)
- 在「設定儲存體 (Configure storage)」區塊
- 將預設的 8 GB 改為 30 GB
- 確認儲存類型為 gp3(若顯示 gp2,請手動切換)
💡 AWS 免費方案包含每月 30 GB gp2/gp3 SSD(首年適用)。設定 30 GB 即可在免費額度內使用。
render_with_liquid: false
步驟 10:確認摘要並啟動(Step 10: Review & Launch)
右側「摘要 (Summary)」面板確認:

  執行個體數量 (Number of instances):1
  AMI:Ubuntu Server 22.04 LTS
  執行個體類型:t3.small
  金鑰對:lattice-cast-key
        |
        ↓
  點擊橘色「啟動執行個體 (Launch instance)」按鈕
        |
        ↓
  出現「您的執行個體目前正在啟動 (Your instance is now launching)」→ 成功!
- 在畫面右側「摘要 (Summary)」面板確認所有設定無誤
- 點擊橘色「啟動執行個體 (Launch instance)」按鈕
- 看到「您的執行個體目前正在啟動 (Your instance is now launching)」訊息即表示成功
render_with_liquid: false
步驟 11:取得執行個體資訊(Step 11: Get Instance Info)
- 點擊「檢視所有執行個體 (View all instances)」
- 等待「執行個體狀態 (Instance state)」變為「執行中 (Running)」(約 1–2 分鐘)
- 點擊執行個體 ID(例如
i-0abc123def456789)進入詳細頁 - 記錄以下資訊,稍後傳給我們:
- 執行個體 ID (Instance ID)
- 公有 IPv4 位址 (Public IPv4 address)
- 安全群組 ID (Security group ID)
render_with_liquid: false
完成後請提供以下資訊 / Please Send Us
完成後,麻煩您把以下資訊用安全方式(1Password / Bitwarden / 加密 email)傳給我們,我們收到後就可以幫您把 lattice-cast 架起來:
-
EC2 執行個體 ID (Instance ID):格式如
i-xxxxxxxxxxxxxxxxx -
公有 IPv4 位址 (Public IPv4 address):格式如
x.x.x.x -
金鑰檔
lattice-cast-key.pem(透過 1Password 共享傳送) -
AWS Region:例如
ap-northeast-1(東京) -
安全群組 ID (Security Group ID):格式如
sg-xxxxxxxxxxxxxxxxx
⚠️ 請勿透過以下管道傳送:純文字 email、LINE、Slack 明文、Telegram、Google Doc ✅ 請使用:1Password 共享、Bitwarden、ProtonMail 加密信
若不知道如何用加密方式傳送,來信告訴我們([email protected]),我們提供 1Password 共享連結,引導您操作。
render_with_liquid: false
操作確認清單 / Checklist
以下項目完成了請打勾,方便您和我們對照進度:
-
已使用
aws.amazon.com(不是.cn結尾的網址) - Region 已確認與 RDS / S3 相同
-
EC2 名稱設為
lattice-cast-app - AMI 選擇 Ubuntu Server 22.04 LTS (x86_64)
- 執行個體類型選擇 t3.small
-
金鑰對類型 RSA、格式 .pem、已下載
lattice-cast-key.pem並備份 - 安全群組 SSH (Port 22) 來源設為「我的 IP (My IP)」
- 安全群組 HTTP (Port 80) 與 HTTPS (Port 443) 來源設為 Anywhere
- 儲存設定為 30 GB gp3
- 執行個體狀態已顯示「執行中 (Running)」
- 已記錄 Instance ID、Public IPv4 位址、Security Group ID
- 已將上方「請提供以下資訊」透過加密管道傳給我們
render_with_liquid: false
常見問題 / FAQ
Q:啟動後一直顯示「暫待 (Pending)」怎麼辦? A:通常 1–3 分鐘後會變為「執行中 (Running)」,請稍候後再刷新頁面。若超過 5 分鐘仍未變更,請截圖告知我們。
Q:我的 IP 是動態 IP,換了網路後 SSH 連不進去怎麼辦?
A:請到 EC2 → 安全群組 → 找到 lattice-cast-sg → 「編輯輸入規則 (Edit inbound rules)」→ 更新 SSH (Port 22) 的來源為目前 IP。若不確定怎麼做,來信告知,我們幫您調整。
Q:.pem 檔下載後要怎麼使用? A:請直接透過 1Password 傳給我們,我們會用它設定部署連線。您不需要自己 SSH 登入。
Q:費用是每天扣嗎?還是每月? A:EC2 依執行時間計費,每小時計算一次。執行個體在「執行中 (Running)」狀態就會計費;停止 (Stop) 後不計算 CPU 費用,但磁碟 (EBS) 費用仍持續計算。
Q:可以先停止執行個體嗎? A:可以。點擊執行個體 → 「執行個體狀態 (Instance state)」→「停止 (Stop)」。需要重啟時選「啟動 (Start)」。注意:停止後重啟,公有 IP 可能改變(除非已設定彈性 IP)。
Q:什麼是彈性 IP (Elastic IP)?需要設定嗎? A:彈性 IP 是固定不變的公有 IP,讓外部服務(例如 DNS)能持續找到這台主機。若您已完成 Route 53(教學 04)的設定,我們會告訴您是否需要申請。目前不需要自行操作。
Q:設定頁出現 .cn 網址怎麼辦?
A:立即關閉,從 https://aws.amazon.com 重新進入即可,不會產生費用或影響已有的設定。
Q:看不懂某個英文按鈕? A:直接把畫面截圖寄給我們([email protected]),我們立刻告訴您要按哪裡。
render_with_liquid: false
遇到問題請聯絡我們 / If Something Goes Wrong
📧 [email protected] — 附上畫面截圖,我們會盡快回覆協助您。
render_with_liquid: false
再次感謝您協助完成這部分!設定完成後,我們會接手把系統架起來,不會再打擾您。如有任何疑問,隨時來信,我們很樂意幫忙。