07 - 建立 RDS PostgreSQL 資料庫 / Create RDS PostgreSQL Database
您好 {{客戶稱呼}},非常感謝您協助我們設定 AWS 環境!這個步驟將為我們建立一個 PostgreSQL 資料庫,是 lattice-cast 系統運作的核心元件之一。操作過程約 20 分鐘,遇到任何疑問都歡迎隨時來信,我們會立即協助。
💡 貼心提醒:截圖可能因 AWS 介面更新略有差異,以實際畫面為準。若畫面找不到某個按鈕,請附上截圖來信告訴我們,我們立刻協助您。
⚠️ 重要:請勿使用 AWS 中國區 本教學僅適用 AWS Global(
aws.amazon.com)。 若頁面出現「中國區 / 光環新網 / 西雲 / Sinnet / NWCD」字樣,請關閉視窗從aws.amazon.com重新進入。 (中國區是另一個完全獨立的服務,與我們要部署的系統不相容。)This guide applies to AWS Global only. Close and restart if you see “China region / operated by Sinnet or NWCD”.
render_with_liquid: false
預估 / Estimate
- 時間 (Time):操作約 10 分鐘;等待資料庫建立完成另需約 8–10 分鐘
-
費用 (Cost):
- 免費方案 (Free Tier):新帳號前 12 個月,db.t4g.micro 每月 750 小時免費
- 免費方案到期後:db.t4g.micro 約 USD $15 / 月 + 儲存費用約 USD $2.30 / 月(20 GB gp3)
-
需準備 (Prerequisites):
- AWS 帳號已建立(參閱第 01 篇)
- EC2 執行個體已在相同 Region 建立(參閱第 05 篇),並知道 EC2 所屬的 Security Group ID
- 1Password 或 Bitwarden 等密碼管理工具,用來安全儲存資料庫密碼
render_with_liquid: false
名詞解說 / Glossary
| 名詞 | 說明 |
|---|---|
| RDS (Relational Database Service) | AWS 提供的全託管資料庫服務 — 就像請 AWS 幫您管一台資料庫伺服器,自動備份、更新都包含在內,您不需要自己維護 |
| PostgreSQL | 我們系統使用的資料庫種類,一種開放原始碼的關聯式資料庫 |
| DB 執行個體 (DB Instance) | 一台資料庫伺服器。建立 RDS 就是在 AWS 租一台資料庫伺服器 |
| VPC (Virtual Private Cloud) | AWS 的隔離虛擬網路 — 就像在 AWS 裡圍一個私有空間。EC2 和 RDS 必須在同一個 VPC 才能互相連線 |
| 安全群組 (Security Group) | 防火牆規則,控制哪些服務或 IP 可以連進資料庫。我們要設定只有 EC2 可以連入 RDS |
| 端點 (Endpoint) | 連接資料庫的網址,格式如 xxxxxx.rds.amazonaws.com。我們部署時會用這個網址連到您的資料庫 |
| 公開存取 (Public Access) | 是否允許網際網路直接連進資料庫。我們設定為「否」,只讓 EC2 連入,更安全 |
| Free Tier | 新帳號前 12 個月的免費用量方案 |
| gp3 | AWS 的 SSD 磁碟類型,兼顧效能與費用 |
render_with_liquid: false
架構說明 / Architecture Overview
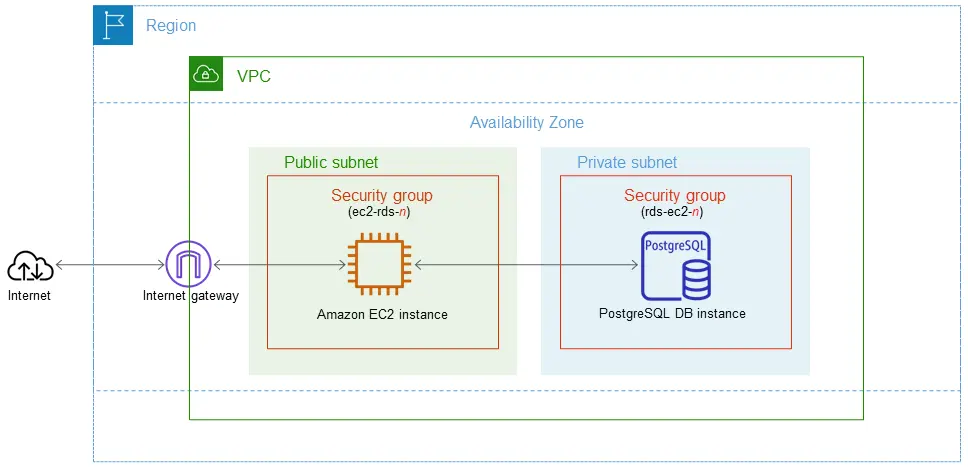
在開始操作之前,這張圖說明了我們要建立的架構:EC2 執行個體放在公開子網路,PostgreSQL 資料庫放在私有子網路,兩者都在同一個 VPC 和 Region 裡,透過 Security Group 規則讓 EC2 能連到資料庫,但網際網路無法直接存取資料庫。
 來源: AWS Docs — Get started with Amazon RDS, 取用日期 2026-04-21
render_with_liquid: false
服務介紹 / About Amazon RDS for PostgreSQL
Amazon RDS for PostgreSQL 是 AWS 的全託管 PostgreSQL 資料庫服務,您不需要安裝或維護任何資料庫軟體。
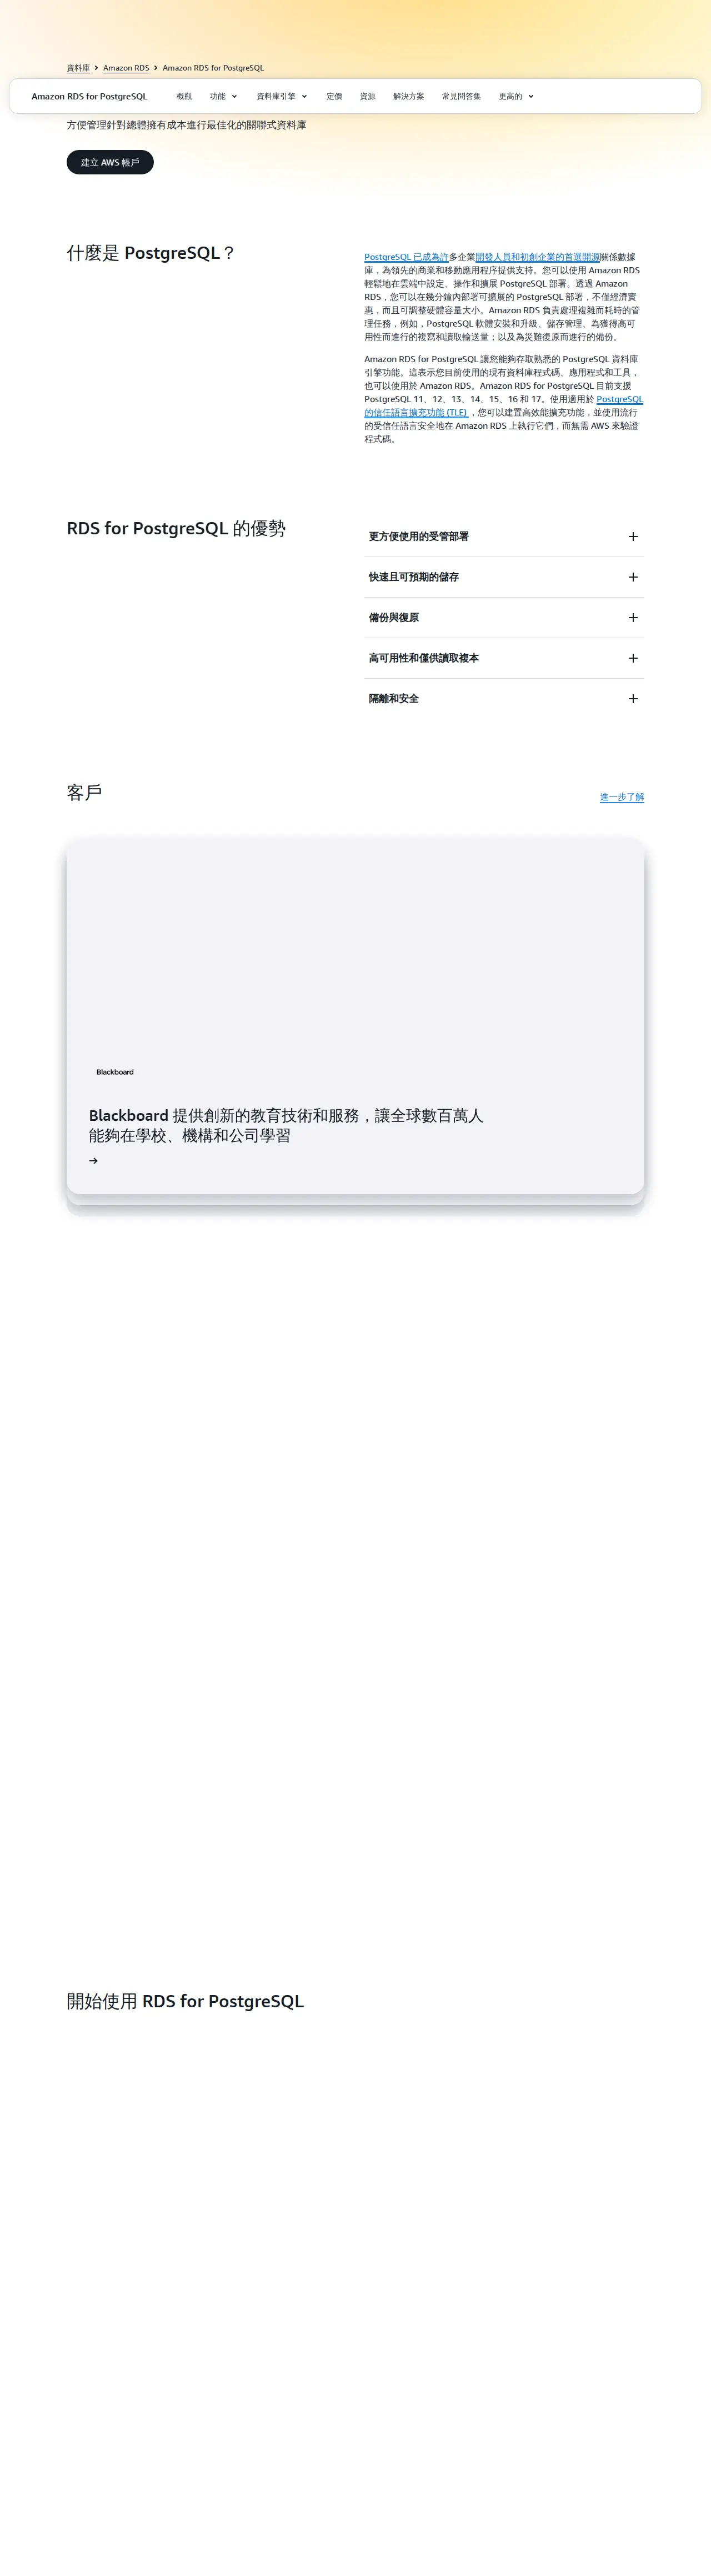 來源: AWS — Amazon RDS for PostgreSQL, 取用日期 2026-04-21
render_with_liquid: false
操作步驟 / Steps
步驟 1:進入 RDS 控制台 (Step 1: Open the RDS Console)
- 開啟瀏覽器,前往
https://console.aws.amazon.com/rds/- 若詢問登入,請使用您的 AWS 帳號登入
-
重要:確認右上角顯示的 區域 (Region) 與您在第 05 篇建立 EC2 時選擇的相同
- 例:若 EC2 在「亞太地區(東京)/ Asia Pacific (Tokyo)」,此處也請選東京
- Region 就像選一個機房城市,EC2 和 RDS 必須在同一個城市才能互通
- 點擊左側選單的「資料庫 (Databases)」
- 點擊右上角橘色按鈕「建立資料庫 (Create database)」
render_with_liquid: false
步驟 2:選擇建立方式 (Step 2: Choose a Creation Method)
進入「建立資料庫 (Create database)」畫面後:
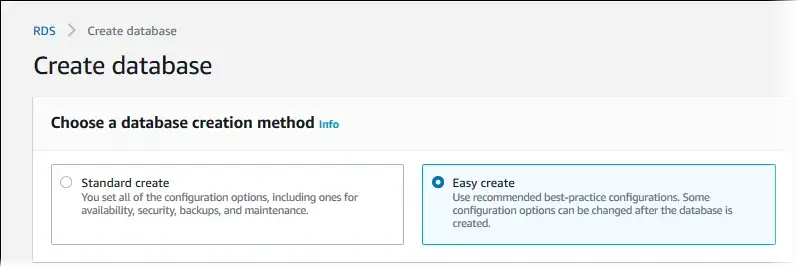
- 在「選擇資料庫建立方法 (Choose a database creation method)」區塊,選擇「標準建立 (Standard create)」
- 請不要選「輕鬆建立 (Easy create)」— 那個選項隱藏了許多重要設定,我們需要自己設定才能確保安全與正確
 來源: AWS Docs — Get started with Amazon RDS, 取用日期 2026-04-21
💡 圖中顯示的是「Easy create」被選中的狀態,請點選左邊的「Standard create」。
render_with_liquid: false
步驟 3:選擇資料庫引擎 (Step 3: Select the Database Engine)
在「引擎類型 (Engine type)」區塊:
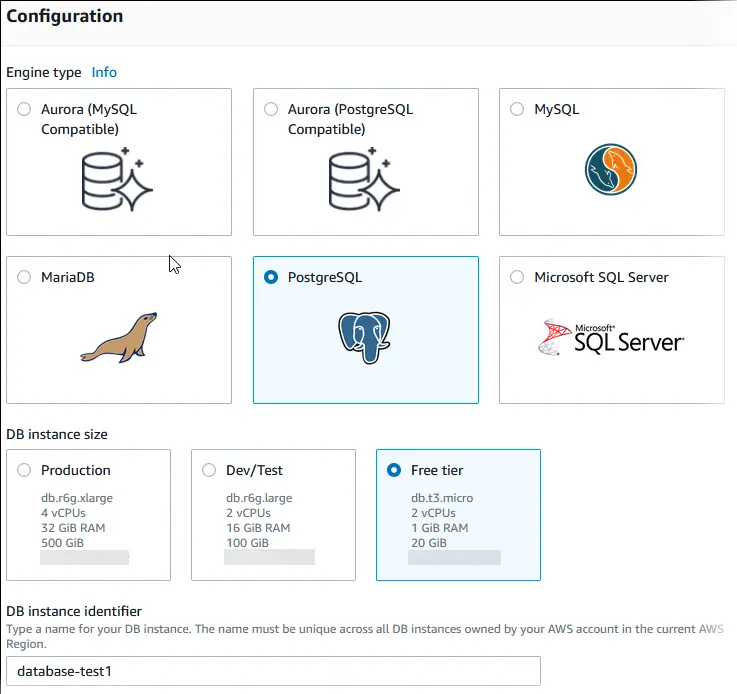
- 點選「PostgreSQL」(大象圖示)
- 引擎版本 (Engine version) 選擇最新的 PostgreSQL 16.x
- 清單中版本號最高的 16.x 即可,例如「PostgreSQL 16.3」
 來源: AWS Docs — Get started with Amazon RDS, 取用日期 2026-04-21
render_with_liquid: false
步驟 4:選擇使用範本 (Step 4: Select a Template)
在「範本 (Templates)」區塊,依情況選擇:
| 情境 | 選擇 | 說明 |
|---|---|---|
| 帳號建立未滿 12 個月 | 免費方案 (Free tier) | 前 12 個月 db.t3.micro 免費使用 |
| 帳號建立已超過 12 個月 | 生產 (Production) | 正式環境建議,有更高可用性選項 |
💡 若您不確定,請先選「免費方案 (Free tier)」。之後我們可以協助您升級。
render_with_liquid: false
步驟 5:設定資料庫名稱與帳號密碼 (Step 5: Configure Identifier and Credentials)
請依照下方填入各欄位:
| 欄位 | 填入值 | 說明 |
|---|---|---|
| 資料庫執行個體識別碼 (DB instance identifier) | lattice-cast-pg |
這台資料庫伺服器的名稱 |
| 主使用者名稱 (Master username) | lattice_admin |
資料庫的管理員帳號 |
| 主密碼 (Master password) | (自行產生 16 碼隨機密碼) | 請見下方說明 |
| 確認密碼 (Confirm master password) | (與上方相同) | 再輸入一次確認 |
關於密碼:
- 請使用您的 1Password 或 Bitwarden 產生一組 16 碼隨機密碼(大小寫英數 + 特殊符號)
- ⚠️ 立即將密碼存入 1Password / Bitwarden 保管庫,設定完成後 AWS 畫面不會再顯示此密碼
- 請不要使用容易猜測的密碼,或直接用您其他服務的密碼
render_with_liquid: false
步驟 6:選擇執行個體規格與儲存空間 (Step 6: Instance Class and Storage)
-
DB 執行個體類別 (DB instance class):
- 點選「高載類別 (Burstable classes (includes t classes))」
- 下拉選擇 db.t4g.micro(免費方案)或 db.t4g.small(正式環境)
- 儲存類型 (Storage type):選「gp3」
-
分配儲存空間 (Allocated storage):填入
20GB -
儲存自動擴展 (Enable storage autoscaling):可保留預設勾選,並將上限設為
100GB
render_with_liquid: false
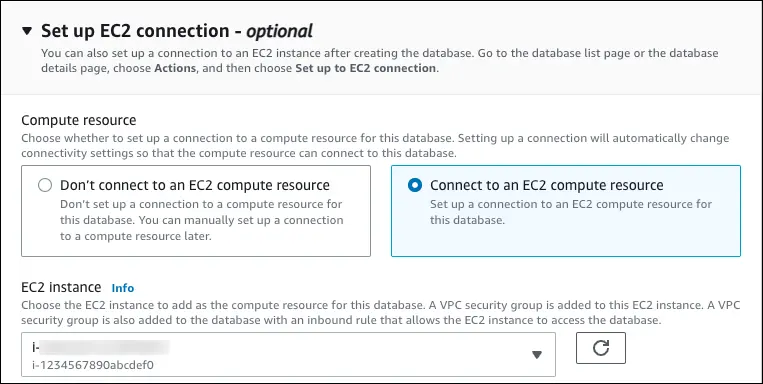
步驟 7:設定 EC2 連線方式 (Step 7: Configure EC2 Connection)
在「連線 (Connectivity)」區段,找到「設定 EC2 連線 — 選用 (Set up EC2 connection — optional)」:
- 選擇「連線至 EC2 計算資源 (Connect to an EC2 compute resource)」
- 在「EC2 執行個體 (EC2 instance)」下拉選單中,選擇您在第 05 篇建立的 EC2 執行個體
- AWS 會自動幫您設定好安全群組規則,讓 EC2 可以連到這台 RDS
 來源: AWS Docs — Get started with Amazon RDS, 取用日期 2026-04-21
💡 若找不到您的 EC2,請確認右上角選擇的 Region 與 EC2 相同。
render_with_liquid: false
步驟 8:設定公開存取 (Step 8: Public Access)
在連線設定的「公開存取 (Public access)」欄位:
- 選擇「否 (No)」
- 這樣資料庫就只有 EC2 可以連進去,網際網路上的任何人都無法直接存取,大幅提升安全性
render_with_liquid: false
步驟 9:設定資料庫驗證方式 (Step 9: Database Authentication)
在「資料庫驗證 (Database authentication)」區塊:
- 選擇「密碼驗證 (Password authentication)」即可
render_with_liquid: false
步驟 10:其他設定 — 初始資料庫名稱 (Step 10: Additional Configuration)
請務必展開「其他設定 (Additional configuration)」(點擊標題旁的箭頭即可展開):
| 欄位 | 填入值 | 說明 |
|---|---|---|
| 初始資料庫名稱 (Initial database name) | latticecast |
必填,若留空 RDS 不會自動建立資料庫 |
| 備份保留期間 (Backup retention period) |
7 天 |
自動備份保存 7 天 |
| 備份視窗 (Backup window) | 保持預設 | |
| 維護視窗 (Maintenance window) | 保持預設 | |
| 刪除保護 (Enable deletion protection) | 勾選啟用 | 防止不小心誤刪資料庫 |
⚠️ 「初始資料庫名稱」非常重要:如果這個欄位留空,RDS 不會自動建立資料庫,我們之後需要額外手動建立,會增加步驟。請確認填入
latticecast。
render_with_liquid: false
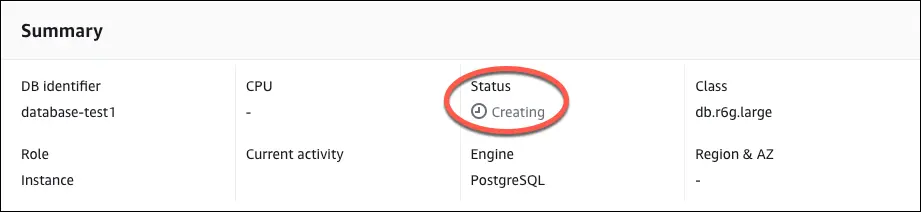
步驟 11:建立資料庫 (Step 11: Create the Database)
- 捲動到頁面底部,確認所有設定後,點擊橘色按鈕「建立資料庫 (Create database)」
- 頁面跳回資料庫清單,會看到
lattice-cast-pg狀態為「建立中 (Creating)」 -
請等待約 8–10 分鐘,直到狀態變為「可用 (Available)」
- 這段時間可以先去做其他事,不需要一直盯著畫面
- 若等了 30 分鐘以上仍未完成,請截圖來信告訴我們
 來源: AWS Docs — Get started with Amazon RDS, 取用日期 2026-04-21
render_with_liquid: false
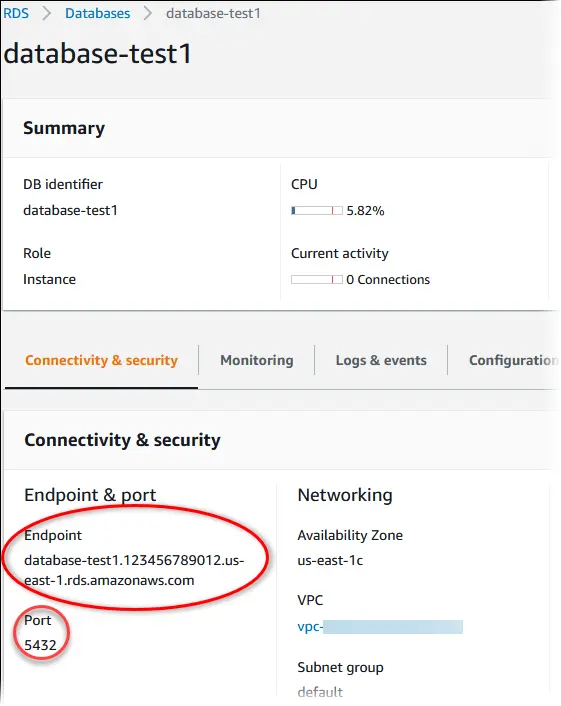
步驟 12:取得資料庫端點 (Step 12: Get the Database Endpoint)
資料庫狀態變為「可用 (Available)」後:
- 點擊
lattice-cast-pg進入詳情頁 - 點擊「連線與安全 (Connectivity & security)」標籤
- 在「端點與連接埠 (Endpoint & port)」區塊找到並複製端點網址:
- 格式如:
lattice-cast-pg.xxxxxxxxxx.ap-northeast-1.rds.amazonaws.com
- 格式如:
- 記下 Port:
**5432**(PostgreSQL 的預設連接埠) - 請將端點、Port、資料庫名稱、帳號、密碼一併存入 1Password / Bitwarden
 來源: AWS Docs — Get started with Amazon RDS, 取用日期 2026-04-21
render_with_liquid: false
完成後請提供以下資訊 / Please Send Us
完成後,麻煩您把以下資訊透過安全方式(1Password 共用保險庫 / Bitwarden 共用資料夾,或 ProtonMail 加密郵件)傳給我們。我們收到後就可以接手把 lattice-cast 系統架起來,不會再麻煩您。
| 項目 | 值(範例) |
|---|---|
| Endpoint(端點網址) | lattice-cast-pg.xxxxxxxxxx.ap-northeast-1.rds.amazonaws.com |
| Port(連接埠) | 5432 |
| Database name(資料庫名稱) | latticecast |
| Master username(主使用者名稱) | lattice_admin |
| Master password(主密碼) | (您設定的 16 碼隨機密碼) |
| AWS Region(區域) | 例:ap-northeast-1(東京) |
⚠️ 請勿用 LINE、一般 Email 明文、Slack、Telegram、Google Doc 傳送以上資訊。 建議:1Password / Bitwarden 共用,或 ProtonMail 加密郵件寄至 [email protected]。
若不知道如何用加密方式傳送,來信告訴我們,我們提供 1Password 共享連結給您使用。
render_with_liquid: false
操作確認清單 / Checklist
操作完成後,您可以對照以下清單確認每個步驟都完成了:
-
已使用
aws.amazon.com(非.cn結尾的網址) - RDS 選擇的 Region 與 EC2 相同
- 資料庫引擎選擇 PostgreSQL 16.x
-
DB instance identifier 填入
lattice-cast-pg -
Master username 填入
lattice_admin - Master password 已儲存至 1Password / Bitwarden
- 已選擇 Standard create(非 Easy create)
-
Instance type 選擇 db.t4g.micro(
Free tier)或 db.t4g.small(Production) - Storage 設定為 20 GB gp3
- EC2 connection 設定連結至您的 EC2 執行個體
- Public access 設定為「否 (No)」
-
Initial database name 填入
latticecast - Backup retention 設定為 7 天
- 已勾選啟用 Deletion protection
- 資料庫狀態已變為「可用 (Available)」
- 已取得 Endpoint 並存入 1Password / Bitwarden
- 已將上方「請提供以下資訊」的內容用安全方式傳給我們
render_with_liquid: false
常見問題 / FAQ
Q:RDS Region 要選哪個?
A:請選和您在第 05 篇建立 EC2 時相同的 Region。若不記得,可以前往 EC2 控制台(console.aws.amazon.com/ec2/),右上角顯示的就是 EC2 所在 Region。
Q:建立後一直是「建立中 (Creating)」超過 20 分鐘? A:屬正常範圍,最久可能需要 15 分鐘。若超過 30 分鐘仍未完成,請截圖聯絡我們,我們協助您確認。
Q:忘記儲存密碼,密碼不見了怎麼辦?
A:進入 RDS → 點擊 lattice-cast-pg → 右上角「修改 (Modify)」→ 修改「Master password」→ 儲存後重新存入 1Password / Bitwarden。
Q:初始資料庫名稱填錯了怎麼辦? A:請來信告訴我們,我們可以在部署時手動建立正確的資料庫名稱,不需要刪除重建 RDS。
Q:Free Tier 到期後會怎樣? A:第 13 個月起開始按量計費(db.t4g.micro 約 USD $15 / 月 + 儲存費)。建議在第 03 篇設定的 Billing Alert 到達前來信通知我們,我們協助您評估是否需要調整規格。
Q:我可以把 Public access 設成 Yes 讓我用工具直接連資料庫嗎? A:我們建議保持「否 (No)」,因為公開存取會增加資料外洩風險。若需要用 DBeaver、TablePlus 等工具連資料庫,可以透過 SSH Tunnel 經由 EC2 轉接,請來信我們提供設定說明。
render_with_liquid: false
遇到問題聯絡我們 / If Something Goes Wrong
來信時請附上:
- 目前停在哪個步驟
- 畫面上顯示的錯誤文字或錯誤代碼
- 您使用的 AWS Region
- 畫面截圖(若方便的話)
我們收到後會儘快回覆協助您。
render_with_liquid: false
再次感謝您撥出時間協助我們設定這個部分!資料庫建立完成後,我們就可以接手把 lattice-cast 系統完整部署起來,不會再需要麻煩您操作 AWS 的這個部分。